Antminer installation tutorial
Antminer mining devices made by the Chinese manufacturer BitMain are very popular among miners. Miners prioritize miners over other mining devices when setting up mining farms due to their lower energy consumption and high durability. The start-ups of different miners are very similar to each other and the same procedure should be followed in their installation. In Antminer installation tutorial article, we will teach you how to set up Ant-Miner S9 and S17.
The Ant-Miner S9, the first version of which was released in 2016 and uses 16-nano meter chips, has become a standard in the industry among miners. Different versions of this miner device are produced by BitMain, the latest models of which are S9 SE and S9k, which have higher processing power than their previous models. You will not need much technical knowledge to install Ant-Miner, and BitMain has made it easy to set up by simplifying the installation of these devices.
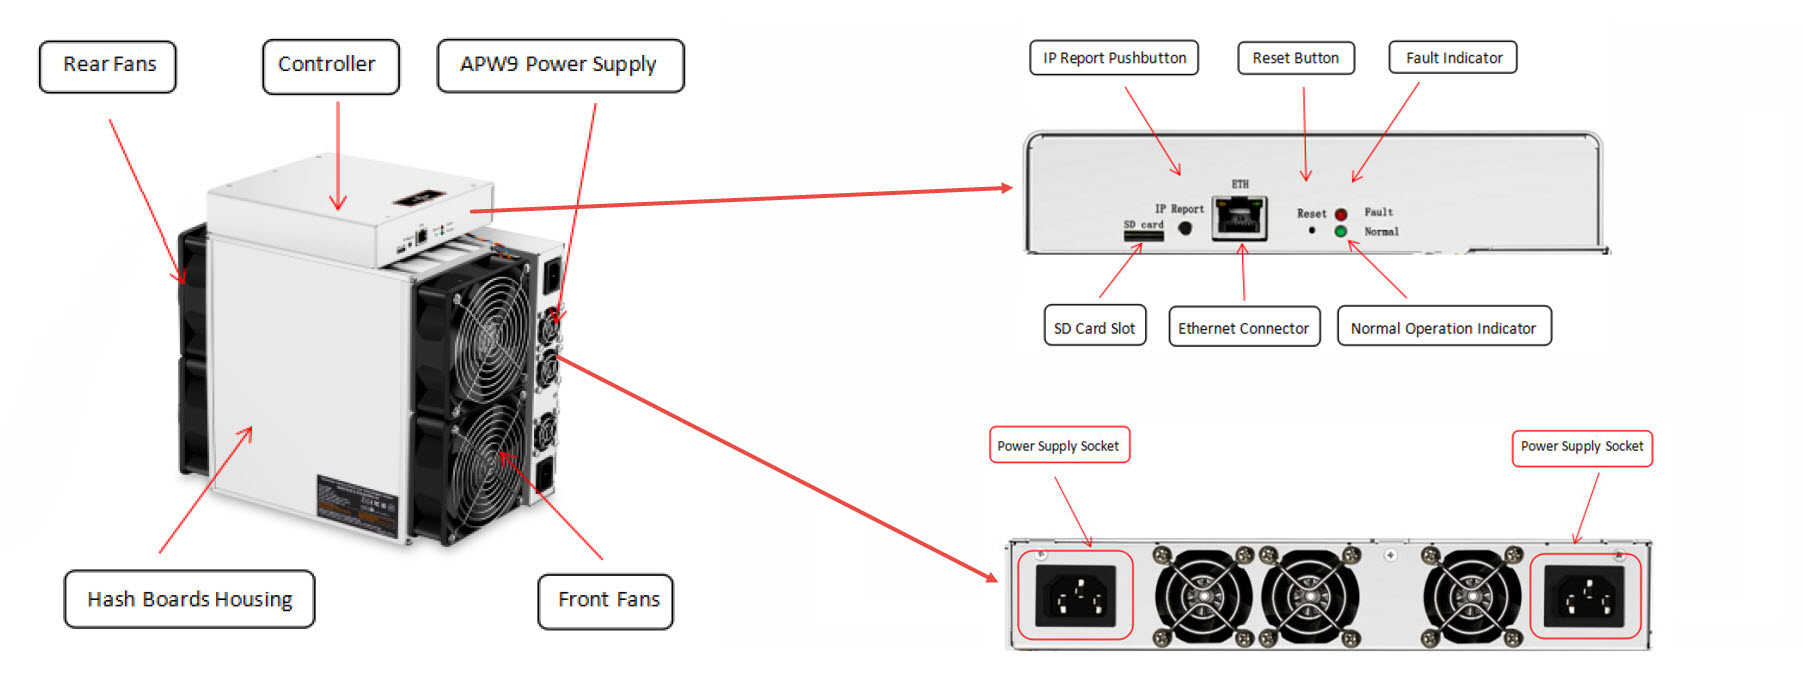
Device components
The components of the S17 Pro and T17 miners are the same. Also in this model, the power supply is part of the device itself and you need two three-pin power cables to supply power.
For a complete overview of popular Ant-miner devices, you can use can read our articles.
AntMiner S9

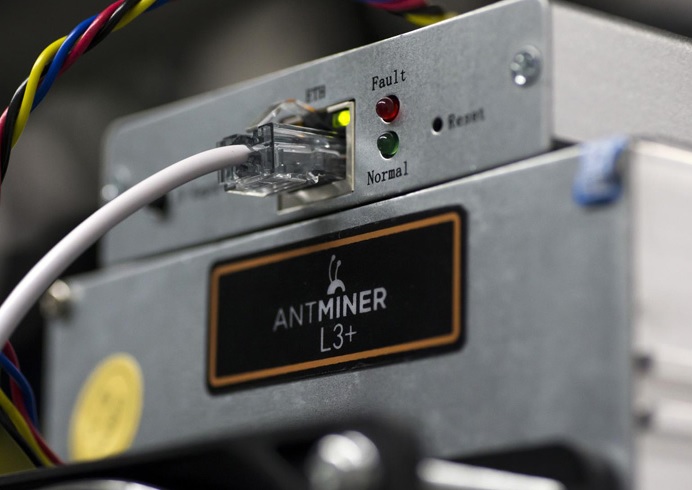
Of course, in some models, some parts do not exist, such as the SD Card slot.
AntMiner S17
Power supply connection
In newer models such as the S17, the device is connected to the power supply with only two cables. But older models like the S9 require a separate power supply to power the device.
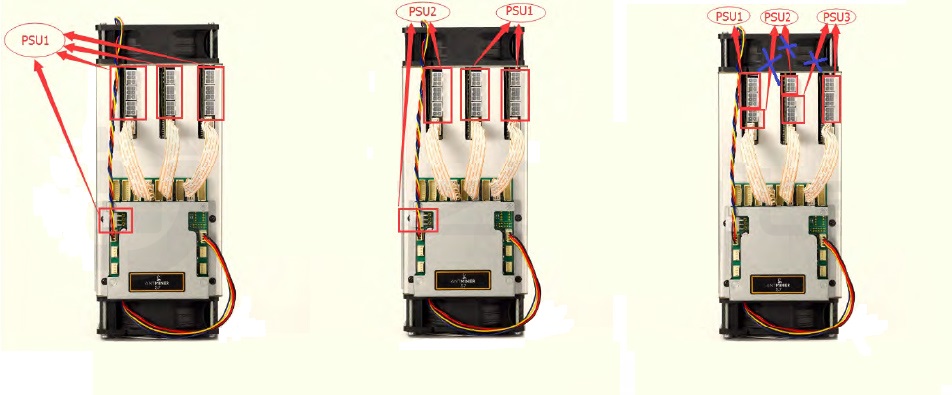
There are ten PCI-e connectors on the top of the AntMineer S9, which you should use to connect the power supply as follows:
There are 9 PCI-e connectors on the hashboards and each hashboard has 3 connectors.
A PCI-e connector is located on the control board.
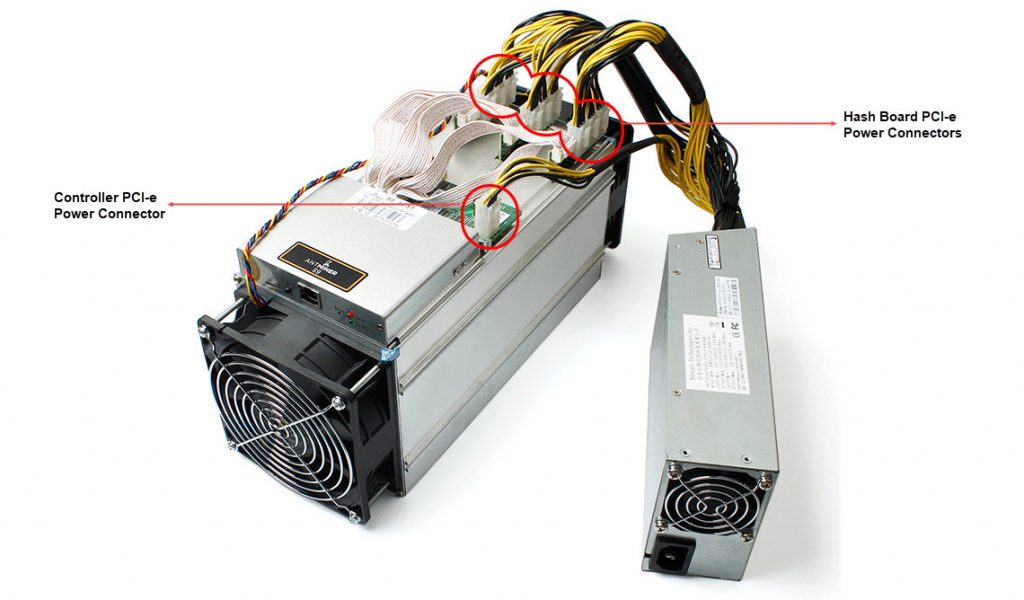
Note that all 3 connectors on a hashboard must be powered by a power supply to prevent possible damage.
Follow the steps below to connect the power supply:
1. Connect all 9 PCI-e cables, noting that each alarm is powered by a single power supply.
2. Connect a PCI-e cable to the miner board control.
3. Connect the network cable, one end of which is connected to the modem, to the miner.
4. To turn on the miner, plug in the power supply.
Note that if you are using multiple power supplies, unplug the power supply that supplies power to the board.
AntMiner Settings and setup
After connecting to the power supply, the first thing you need to do is finding the IP of the miner. To do this, you need a computer or laptop that is connected to the same modem. Using a laptop or computer to find the IP, adjust the miner and monitor because it is necessary and will not be needed during mining.
You can use various software such as Advanced IP Scanner and Angry IP Scanner to find the IP of the device, but BitMain company has suggested IPReporter software in the guide of setting up Ant-Miner, the file of which is available for download on BitMain website.
1. After downloading the file and unzipping it, run it in Run As Administrator mode. The network DHCP protocol automatically distributes IP addresses.
If you have a mining farm, change the Shelf, Step and Position values.
If you are using a device, do not touch the default values.
2. Click Start.
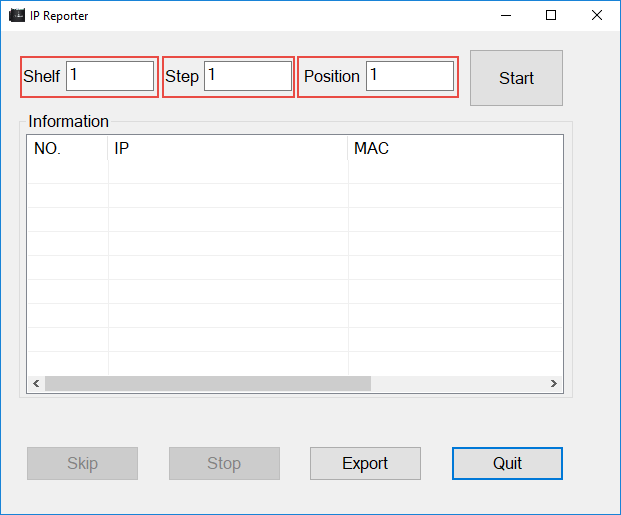
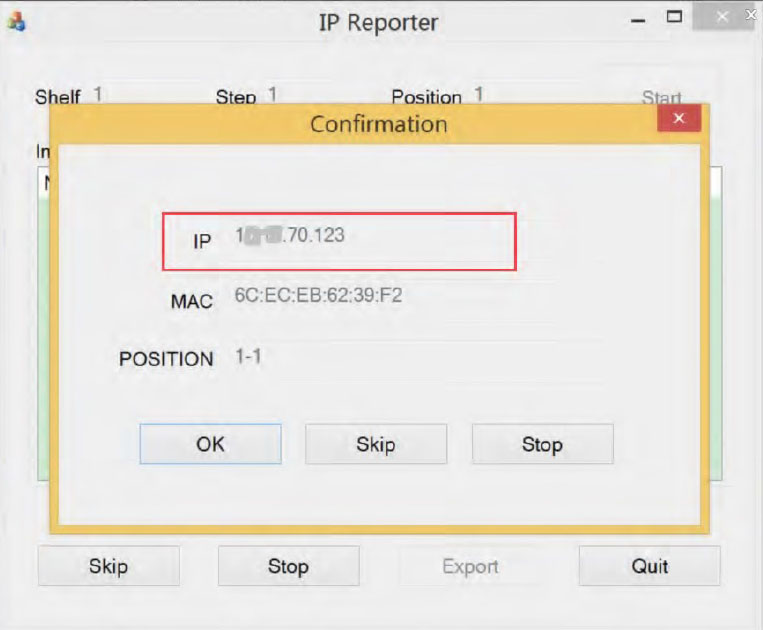
3. After clicking Start, press the IP Report button on the device control panel for about 5 seconds to beep.
4. The device ip is displayed on the IPReporter application. Enter it in your browser (Mozilla Firefox or Chrome).
5. Use root for username and password.
6. In the Network tab, you can assign a static IP to the miner device, which is optional.
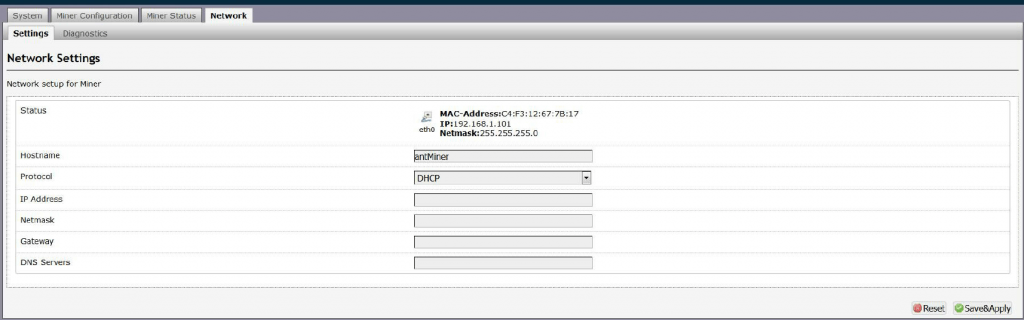
7. Save and apply the changes.
Miner configuration
Mining pool settings
To set up an mining pool, first of all you need to find a suitable pool according to your device and the digital currency you intend to mine.
On the Miner Configuration tab on the S9 Miner Configuration device, click on General Setting (at the Miner S17 and T17 tabs, the information you need to enter are on the Miner Configuration tab).

In this section, you must enter the URLs of the three pools in order of priority from Pool 1 to Pool 3, so that if the first pool goes offline, Ant Miner will be connected to the second and third pools.
Then you need to enter the Worker ID along with the password you use in the pool.
Next, according to the Ant-Miner model, some additional settings such as adjusting the fan speed, turning off the miner if the temperature exceeds 80 degrees Celsius, and also in the new models such as S17 and T17, there are different modes of Turbo, Normal and Low Power.
Miner performance monitoring
Click the Miner Status tab to monitor AntMiner performance.
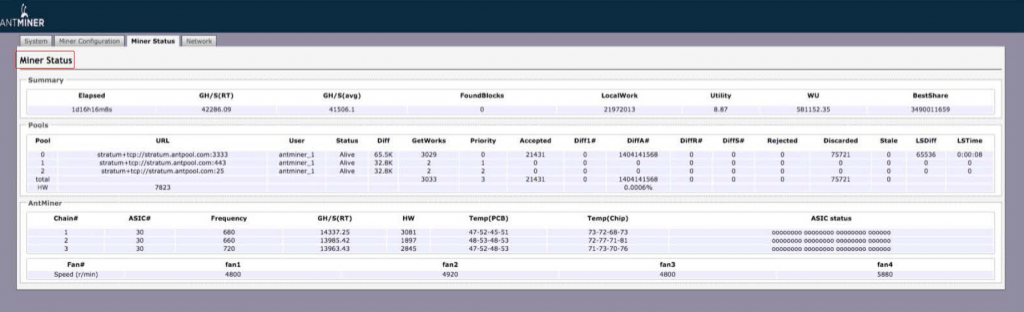
| Option | Explanation |
|---|---|
| ASIC# | Number of chips found in each hash board |
| Frequency | Frequency settings for each hash board |
| GH/S(RT) | The output hash rate of each hash board |
| Temp(PCB) | Temperature of each hash board in Celsius (applies only to miners whose operating frequency is constant) |
| Temp(Chip) | The temperature of each chip in each hash board |
| ASIC status | One of the following three situations may occur: O – Works fine X – Found an error – – It’s broken |
Note that on the S17, T17, and S17 Pro, the firmware of the device when the Temp (PCB) temperature reaches 75 ° C or the temperature of the chips, ie Temp (chips) reaches 100 ° C, the error message “Temperature is too high!” Will register in the Kernel log page.
AntMiner Management
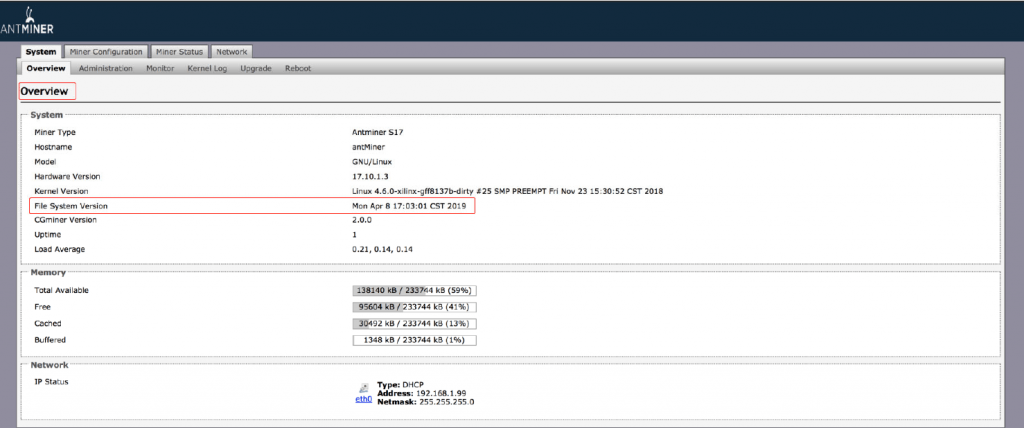
To check the firmware version of your device, go to the System and Overview tabs.
The phrase File System Version indicates the date of the firmware used. For example, in the image below, which is related to an AntMiner S17, the firmware version is 2010408, which actually shows the release date of that firmware.
Ant-Miner firmware update
First and foremost, make sure that the Antminer is plugged in during the upgrade.
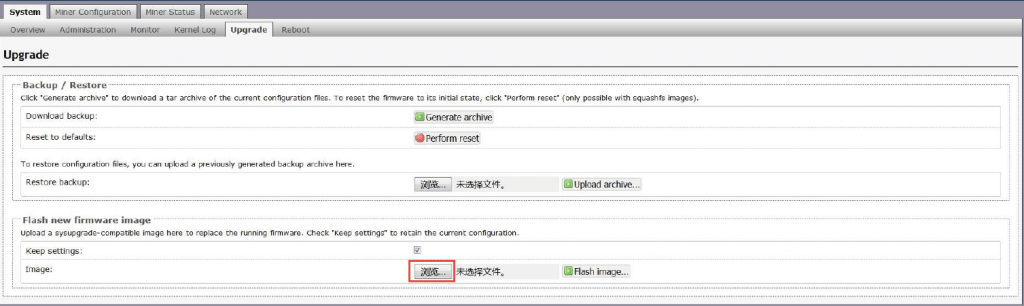
To keep your current settings after updating the firmware, you must check Keep Settings.
Select the new firmware you downloaded by clicking the button specified in the image and then clicking on the Flash Image.
After completing the installation, the “Restart Request” message will ask you to restart the device to use the new firmware. Of course, you can click the Go Back button to launch the new firmware the next time it is restarted.
You can visit the BitMain website to download Ant Miner firmware. It is recommended that you always download your device firmware from the main website.
Factory settings
To return the device to its original settings, first turn on the device and let it run for 5 minutes. Then hold the Reset button on the control board for 10 seconds.
To make sure the operation is successful, the device’s red light goes off once every 15 seconds.