
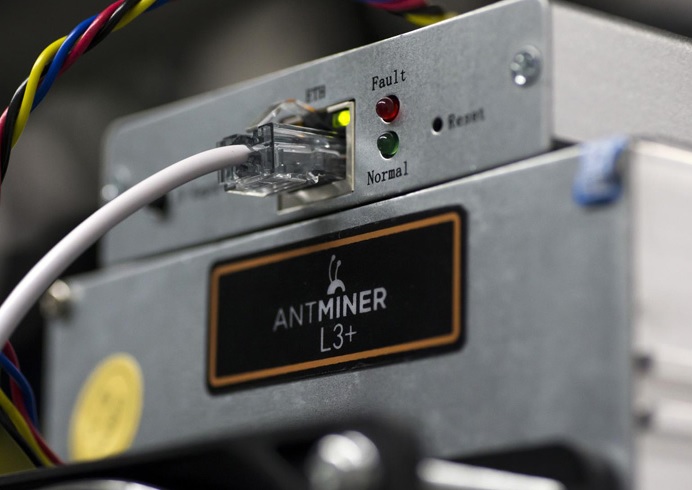
Antminer mining devices, manufactured by Bitmain, are among the most widely used ASIC miners for Bitcoin mining. Their popularity comes from their specialized mining hardware, high computing performance, and, depending on the model and operating conditions, competitive energy efficiency.
Although Antminer models have different hardware configurations, the basic installation process is similar. You generally need to connect the miner to an appropriate power supply, connect it to your network, find its IP address, access the web interface, configure the mining pool, and then monitor hashrate, temperature, and hardware status.
In this Antminer installation guide, we explain how to set up and configure Antminer models including the Antminer S9 and S17, while also covering the general principles that apply to newer Antminer generations.
Important: Power requirements, connectors, firmware interfaces, login credentials, temperature limits, and available settings vary by model and firmware. Always check the documentation for your exact Antminer before making hardware or firmware changes.
Antminer S9 and S17
The Antminer S9 was introduced in 2016 and became one of the most recognizable Bitcoin ASIC miners. It uses 16-nanometer ASIC chips and was produced in several versions, including the S9 SE and S9k.
The Antminer S17 represents a newer generation of Bitmain mining hardware and uses a different hardware and power configuration from the S9.
The basic installation process for these miners is similar:
- Prepare the miner and power supply.
- Connect the power cables.
- Connect the Ethernet cable.
- Turn on the miner.
- Find its IP address.
- Access the web interface.
- Configure the network.
- Configure the mining pool.
- Monitor hashrate and temperature.
- Update firmware when necessary.
Device Components
The exact components depend on the Antminer model.
Older models such as the S9 normally require an external power supply, while some newer models or specific packages may include an integrated or compatible power-supply configuration.
The S17 Pro and T17 have similar hardware layouts, although exact configurations can vary by revision.
Before installation, identify:
- Hashboards
- Control board
- Power connectors
- Ethernet/network port
- Fans
- Power supply
- Reset or IP-report button
- Firmware or storage interfaces where applicable
Some models may include features such as an SD card slot, while others do not.
AntMiner S9
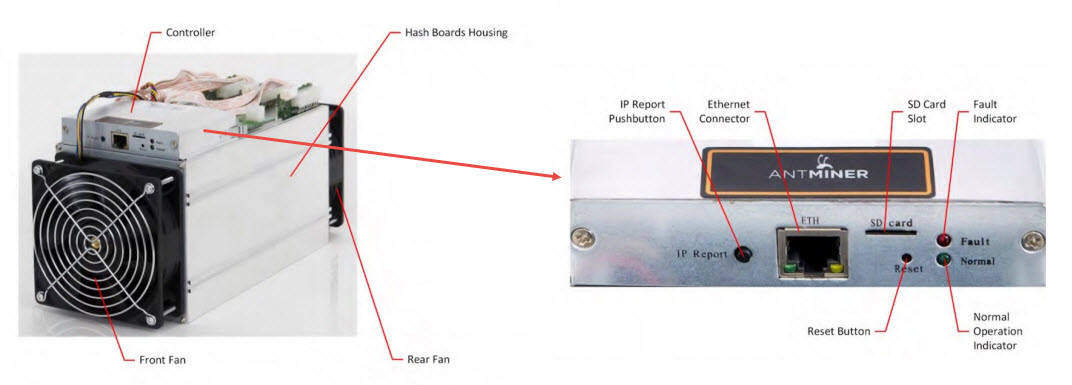
The Antminer S9 contains multiple hashboards and requires the appropriate PCIe power connections.
The exact connector arrangement should be checked against the specific S9 version and power supply being used.
AntMiner S17
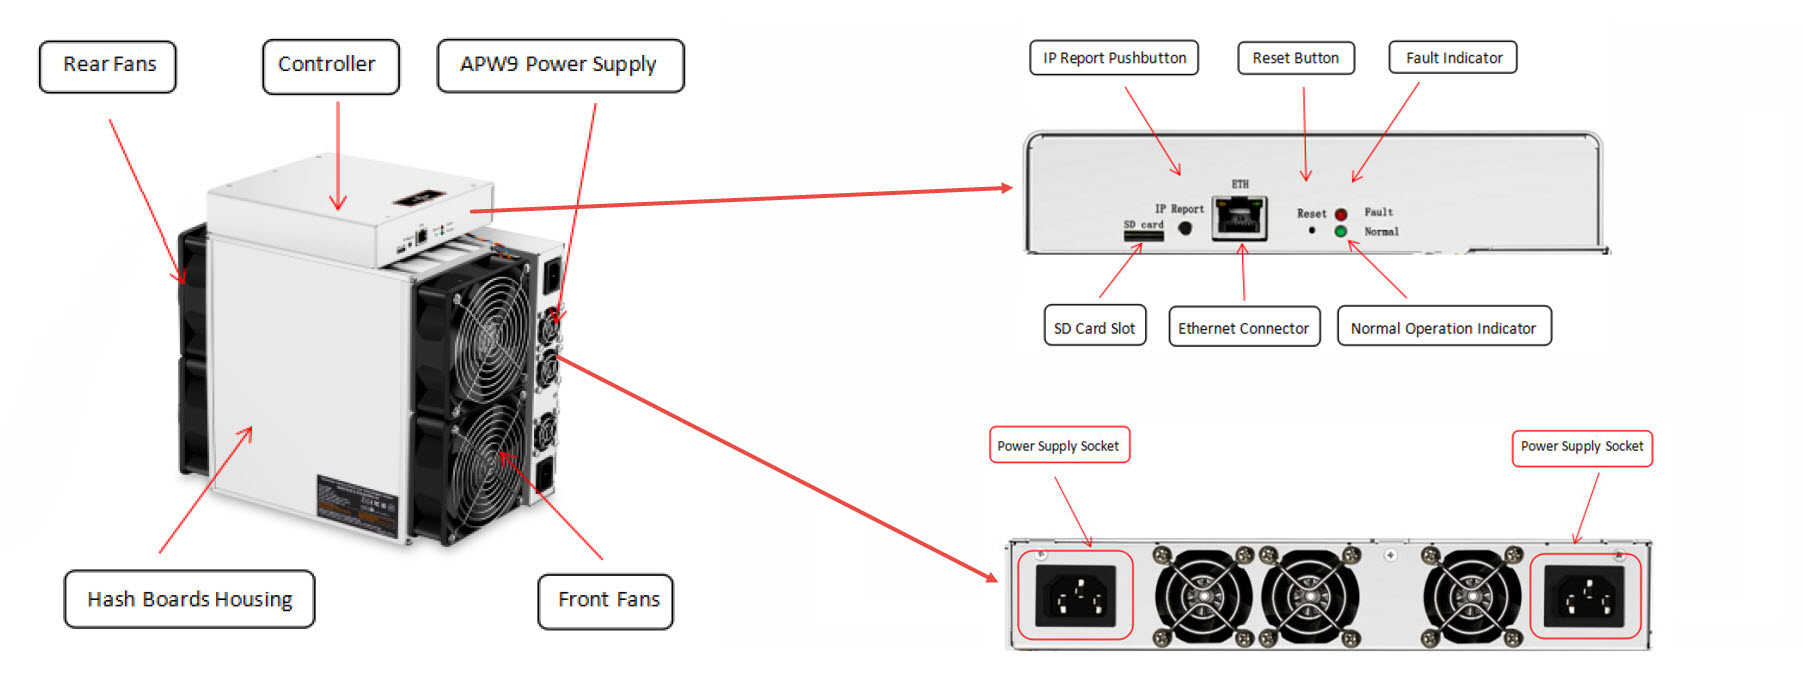
The Antminer S17 uses a different hardware and power configuration from the S9.
The installation principles are similar, but S17-specific power, firmware, temperature, and operating-mode settings should not automatically be applied to other Antminer models.
Step 1: Connect the Antminer Power Supply
Power connection is one of the most important parts of an Antminer installation.
Before connecting the miner:
- Verify that the power supply is compatible with the exact model.
- Check the required voltage and power capacity.
- Inspect all cables and connectors.
- Make sure the power supply is switched off before connecting cables.
- Connect all required power connectors.
Older Antminer models such as the S9 generally require an external power supply, while newer models can have different power arrangements.
Antminer S9 PCIe Power Connections
The original S9 configuration uses multiple PCIe power connectors.
The S9 configuration described in the original installation material has:
- 9 PCIe connectors for the hashboards
- An additional PCIe power connection for the control board
- 3 power connectors associated with each hashboard
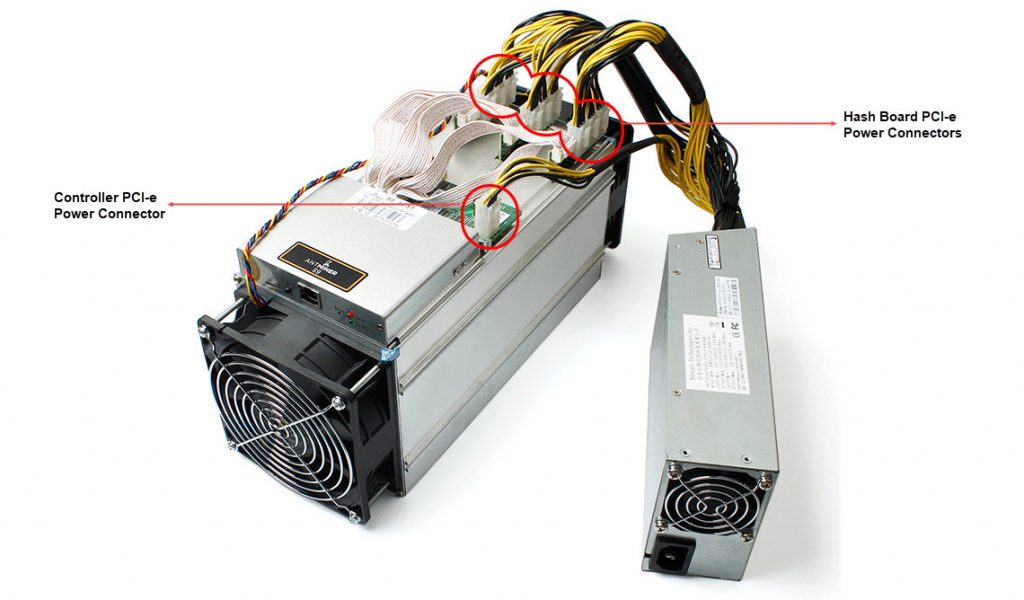
All required connectors on each hashboard should be connected according to the manufacturer’s configuration.
Do not operate the miner with incomplete or incorrectly connected hashboard power.
How to Connect the Antminer Power Supply
- Turn off the power supply.
- Connect the required PCIe cables to the hashboards.
- Connect the required PCIe cable to the control board.
- Connect the Ethernet cable.
- Check every connection carefully.
- Connect the power supply to the electrical source.
- Turn on the power supply.
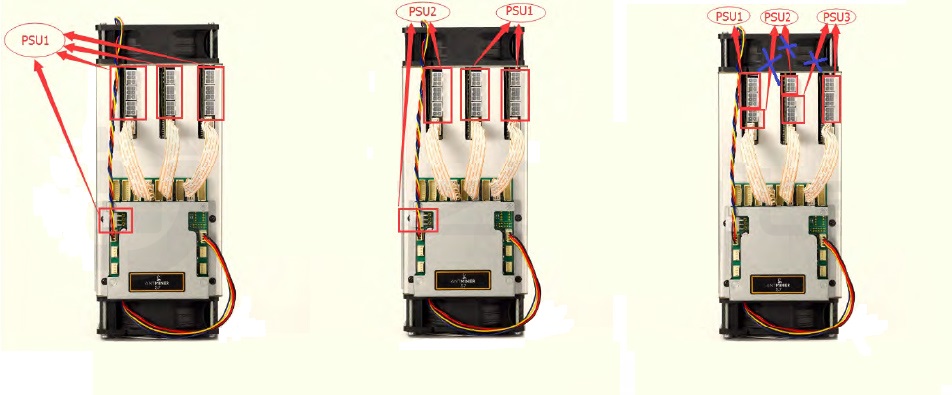
Important Multiple-PSU Warning
If a mining setup uses multiple power supplies, the power connections must be arranged correctly according to the miner and PSU manufacturer’s instructions.
Do not disconnect or reconnect power cables while the miner is operating.
Incorrectly synchronized or connected power supplies can damage mining hardware.
Step 2: Connect the Antminer to Your Network
Connect one end of an Ethernet cable to the Antminer and the other end to your router or network switch.
Your computer or laptop should normally be connected to the same local network during initial configuration.
You need a computer during setup because it makes it easier to:
- Find the miner’s IP address
- Access the web interface
- Configure network settings
- Configure the mining pool
- Monitor performance
- Update firmware
Once the miner has been configured, you generally do not need to keep a computer directly connected to it for normal mining.
Step 3: Turn On the Antminer
After checking the power and Ethernet connections, turn on the power supply.
The miner’s fans may run at high speed during startup. This can be normal.
Allow the miner to complete its startup process before attempting to configure it.
Check that:
- Fans are operating.
- The network connection is active.
- The control board starts correctly.
- No obvious hardware errors are present.
Step 4: How to Find the Antminer IP Address
After powering on the miner, the next step is to find its IP address.
Your computer or laptop should be connected to the same network as the Antminer.
The miner will normally receive an IP address from your router using DHCP.
You can find the address using:
- Your router’s connected-device list
- Advanced IP Scanner
- Angry IP Scanner
- Bitmain’s compatible IP discovery utility
- Other appropriate network-management tools
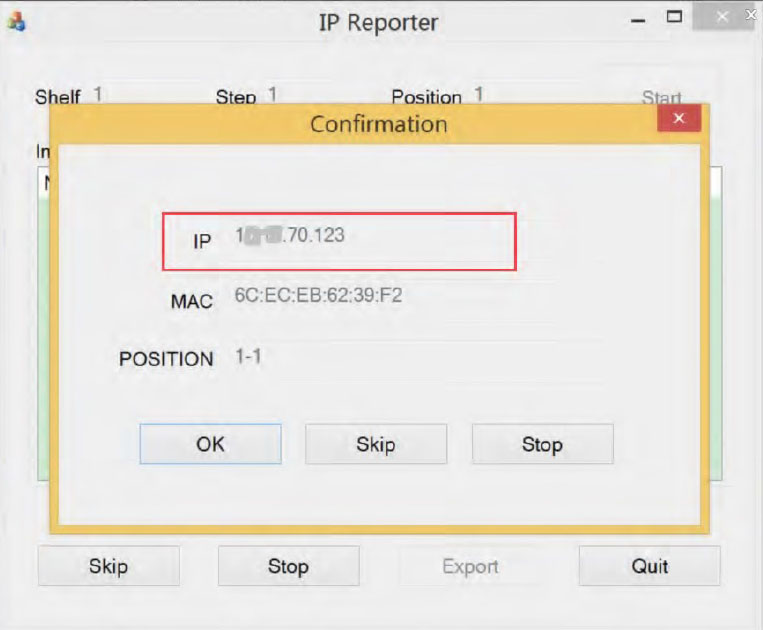
Bitmain’s IPReporter utility was commonly used with older Antminer models.
Using Bitmain IPReporter
After downloading and extracting the compatible IPReporter utility:
- Run the application with the required permissions.
- Make sure the Antminer and computer are connected to the same network.
- Leave the default Shelf, Step, and Position values if you are configuring a single device.
- For a mining farm, use the appropriate values to identify the miner’s physical location.
- Click Start.
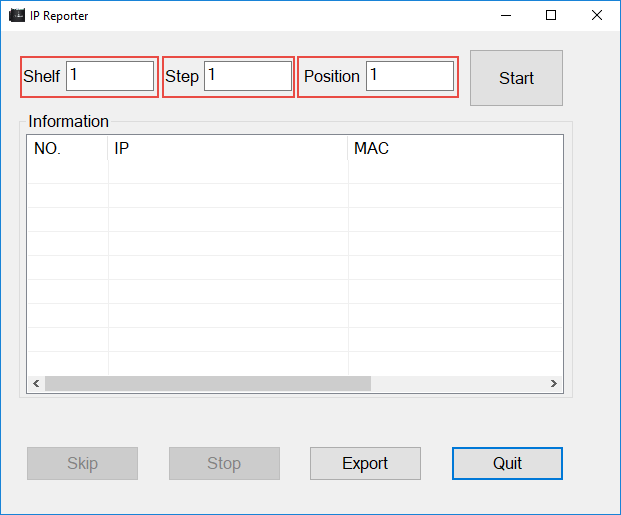
On compatible devices, press the IP Report button on the miner’s control panel for several seconds until the device responds.
The IP address should then appear in IPReporter.
Step 5: Access the Antminer Web Interface
Once you know the IP address, open a web browser such as Chrome or Firefox.
Enter the IP address in the address bar.
For example:
http://192.168.1.100
The Antminer web interface provides access to configuration and monitoring functions.
Depending on the model and firmware, you may see sections such as:
- Miner Status
- Miner Configuration
- Network
- System
- Firmware
- Logs
- User Management
Antminer Username and Password
Older Antminer firmware versions commonly used default credentials such as root for the username and password.
However, do not assume that root/root is the correct login for every Antminer.
Default credentials vary between models, firmware versions, and revisions.
Check the documentation for your specific miner.
After accessing the device for the first time, change the default password.
Step 6: Configure the Antminer Network
After logging in, open the Network section.
Depending on the firmware, you may be able to configure:
- DHCP
- Static IP address
- Subnet mask
- Gateway
- DNS server
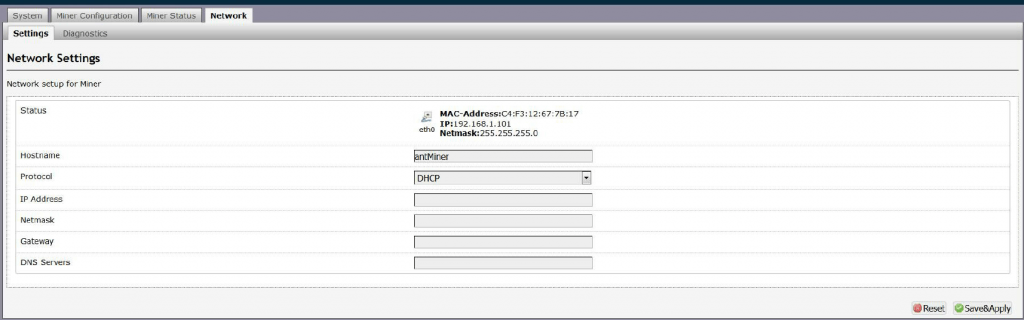
DHCP is usually sufficient for an initial setup.
A static IP can be useful when operating multiple miners because it makes each device easier to locate and manage.
If you assign a static IP, make sure it is compatible with your router’s network configuration.
After changing the network configuration, save and apply the settings.
Step 7: Configure the Mining Pool
After network configuration, the next important step is connecting your Antminer to a mining pool.
A mining pool combines the computing power of many miners. Instead of attempting to mine independently, your ASIC contributes hashrate to the pool and receives rewards according to the pool’s payment system and your contribution.
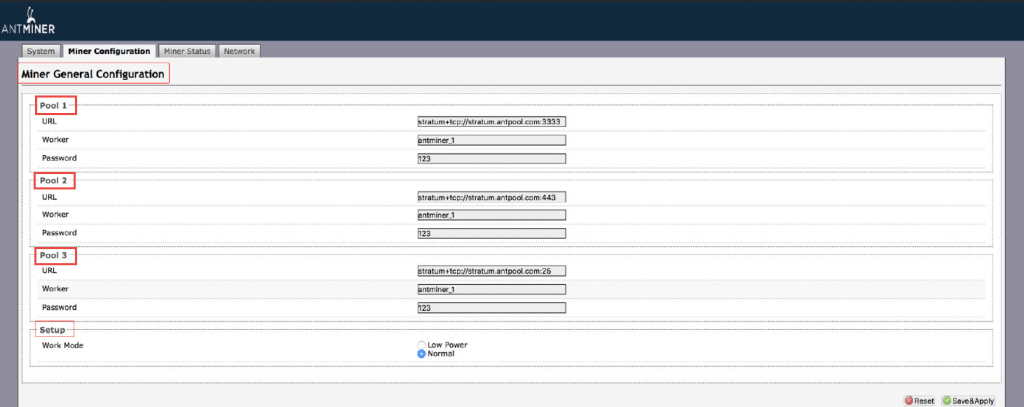
Open the Miner Configuration section or its equivalent.
You will typically find several pool fields, such as:
- Pool 1
- Pool 2
- Pool 3
How to Enter a Mining Pool URL
Your mining pool will provide one or more server addresses.
These addresses can vary depending on:
- Cryptocurrency
- Geographic region
- Mining algorithm
- Network protocol
- Pool configuration
Enter the appropriate pool URL into the corresponding field.
For example:
- Pool 1: Primary mining server
- Pool 2: Backup mining server
- Pool 3: Additional backup server
Using multiple pool entries can allow the miner to switch to another configured pool if the primary pool becomes unavailable.
Always use the exact connection information supplied by your chosen mining pool.
Worker ID and Password
The mining pool normally provides a worker-name format.
A worker identifier allows you to distinguish individual miners.
For example:
farm01farm02farm03
The exact format depends on your mining pool.
Some mining pools also provide a password field. Follow the pool’s instructions rather than assuming that there is a universal pool password.
After entering the information, save the configuration.
Antminer Operating Modes and Fan Settings
Some Antminer models provide additional settings for:
- Fan speed
- Power consumption
- Performance mode
- Temperature management
For example, certain S17 and T17 firmware versions may provide operating modes such as Turbo, Normal, and Low Power.
These settings can affect hashrate, electricity consumption, temperature, fan speed, and hardware stability.
Do not assume that these settings are available or appropriate on every Antminer model.
Step 8: Monitor Antminer Performance
After configuring the mining pool, open the Miner Status section.
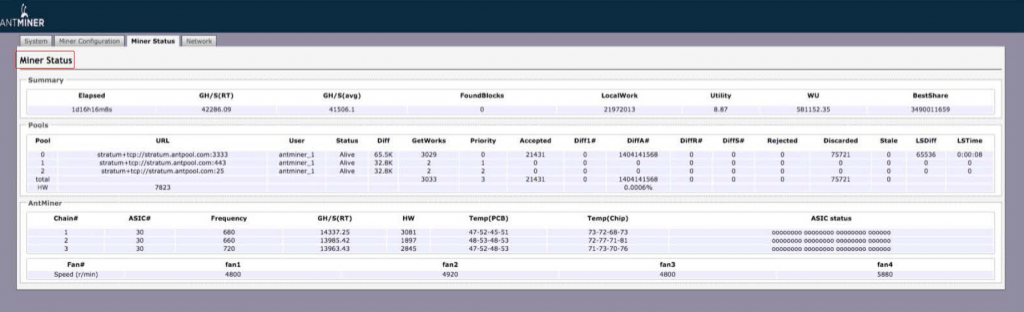
Depending on the model and firmware, the status page may display:
| Option | Explanation |
|---|---|
| ASIC# | Number of ASIC chips detected on a hashboard. |
| Frequency | Operating frequency of the hashboard. |
| GH/S (RT) | Hashrate of the hashboard. |
| Temp (PCB) | Temperature of the hashboard PCB. |
| Temp (Chip) | Temperature of the ASIC chips. |
| ASIC Status | Indicates whether ASIC chips are operating normally or reporting an error. |
Older Antminer interfaces may use status indicators such as O for normal operation, X for an error, and – for an unavailable or undetected ASIC.
How to Interpret Antminer Hashrate
Hashrate shows how much computational work the miner is performing.
Depending on the model, hashrate may be displayed in:
- GH/s
- TH/s
- PH/s
The expected hashrate depends on the exact Antminer model, firmware, operating conditions, and mining algorithm.
A temporary fluctuation does not necessarily indicate a problem. Persistent low hashrate, however, should be investigated.
Antminer Temperature Monitoring
ASIC miners generate substantial heat, so temperature monitoring is an important part of an Antminer mining setup.
Older S17, T17, and S17 Pro firmware versions could generate temperature warnings when predefined thresholds were reached. Those historical thresholds should not be treated as universal limits for every Antminer.
Always use the recommended operating temperature range for your exact model.
Good ventilation is essential. Make sure:
- Air intakes are not blocked.
- Exhaust airflow is unobstructed.
- Fans are working correctly.
- Dust is removed regularly.
- Miners are not packed too closely together.
- Room temperature is appropriate.
Step 9: AntMiner Management
To check the installed firmware version, open the appropriate System or Overview section.
The exact menu names depend on the firmware.
Older Antminer interfaces may display information such as:
- Firmware version
- File system version
- Hardware information
- System uptime
- Model information
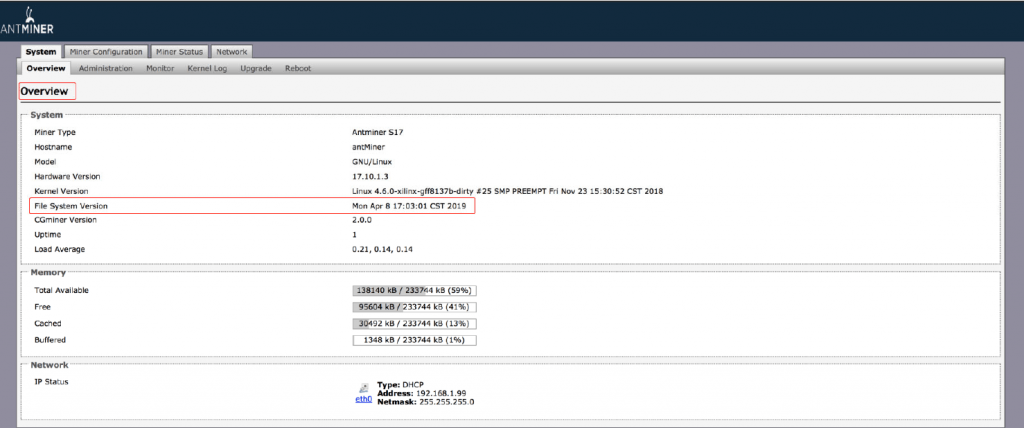
The firmware information can help determine whether your miner is running an older version and whether a compatible update is available.
Step 10: Update AntMiner Firmware
Firmware updates can provide bug fixes, stability improvements, security improvements, compatibility changes, and sometimes performance-related improvements.
Before updating firmware:
- Identify the exact Antminer model.
- Check the current firmware version.
- Obtain compatible firmware from a trusted source.
- Back up relevant configuration information.
- Make sure the miner has stable power.
- Do not interrupt the update process.
How to Update Antminer Firmware
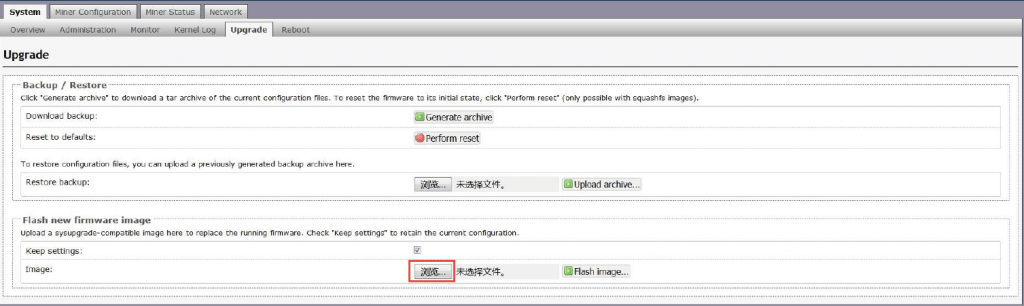
The exact interface varies by model, but the general process is:
- Open the firmware update section.
- Select the appropriate firmware file.
- If the interface provides a Keep Settings option, decide whether you need to preserve your current configuration.
- Upload the firmware.
- Start the update, such as by selecting Flash Image where available.
- Wait for the installation to finish.
- Allow the miner to restart.
- Check the new firmware version.
- Verify the mining-pool configuration.
- Check hashrate, temperature, fans, and hashboards.
Do not disconnect power while firmware is being installed unless the manufacturer’s instructions specifically require it.
Always use firmware intended for your exact Antminer model and hardware revision.
Antminer Security Best Practices
Security is an important part of operating ASIC miners, particularly in larger mining facilities.
Change Default Passwords
Change the default administrator password after the initial login.
Protect the Management Interface
Avoid exposing the Antminer management interface directly to the public internet.
Use a Secure Local Network
Place mining equipment on a controlled network whenever possible.
Keep Firmware Updated
Use appropriate firmware from trusted sources and verify that it is compatible with your exact hardware.
Restrict Administrative Access
Only authorized users should be able to change miner configuration.
Common Antminer Problems and Solutions
Antminer Does Not Turn On
Check the power source, PSU, power cables, electrical connections, control board, and circuit protection.
Antminer Cannot Connect to the Network
Check the Ethernet cable, router, network switch, DHCP settings, IP configuration, and gateway.
Cannot Find the Antminer IP Address
Make sure the miner is powered on, Ethernet is connected, your computer is on the same network, and the router is operating normally.
Antminer Is Not Connecting to the Mining Pool
Check the pool URL, port, worker name, network connection, DNS settings, and pool status.
Antminer Has Low Hashrate
Check temperature, fan operation, hashboard status, hardware errors, power supply, firmware, and pool configuration.
One Hashboard Is Not Working
Check the power connectors, data connections, hashboard status, error logs, and temperature. Do not reconnect hardware while the miner is powered on.
Antminer Is Overheating
Improve room ventilation, airflow, exhaust capacity, miner spacing, and dust control. Also check that the fans are operating correctly.
Antminer Installation Checklist
Hardware
- Correct Antminer model identified
- Compatible power supply installed
- Correct power cables connected
- Hashboards connected correctly
- Adequate ventilation available
Network
- Ethernet connected
- Miner has an IP address
- Web interface accessible
- Network configuration verified
Mining
- Mining pool configured
- Worker name configured
- Backup pool configured if appropriate
- Miner connected to pool
- Shares being accepted
Monitoring
- Hashrate checked
- Temperature checked
- Fan status checked
- Hashboards detected
- Error logs reviewed
Security
- Default credentials changed
- Management interface protected
- Firmware source verified
- Network access restricted
Antminer Installation and Bitcoin Mining
Installing an Antminer is only the first step in operating a Bitcoin mining system.
Bitcoin mining profitability depends on several factors, including ASIC hashrate, electricity cost, mining difficulty, Bitcoin price, pool fees, hardware cost, cooling, and maintenance.
If you are new to Bitcoin mining, read our Bitcoin mining basics guide to understand how Bitcoin mining, Proof of Work, mining hardware, mining pools, electricity consumption, and profitability work together.
Frequently Asked Questions
How do I install an Antminer?
Connect the appropriate power supply and Ethernet cable, turn on the miner, find its IP address, access the web interface, configure the mining pool, and monitor hashrate and temperature.
How do I find my Antminer’s IP address?
You can usually find it through your router’s connected-device list or an appropriate network discovery tool. Your computer and Antminer should normally be connected to the same local network.
How do I configure an Antminer mining pool?
Access the miner’s web interface, open the mining configuration section, enter the pool URL, worker name, and any required password or port information, then save the configuration.
Why is my Antminer not mining?
Check the network connection, mining pool configuration, power supply, hashboard status, temperature, fan operation, and system logs.
Why is my Antminer hashrate low?
Low hashrate can be caused by overheating, hardware problems, insufficient power, firmware issues, pool connectivity, or configuration problems.
Does every Antminer use the same power supply?
No. Power requirements and connector configurations vary between models. Always verify the requirements for the exact Antminer model.
Should I update Antminer firmware?
Firmware updates can improve stability or security, but you should only install firmware intended for your exact model and hardware configuration.
How hot can an Antminer get?
Operating temperatures vary by model and environment. Always use the manufacturer’s recommended operating range rather than applying one temperature limit to every Antminer.
Conclusion
Antminer installation is relatively straightforward once the power, network, and mining-pool requirements are understood.
For older models such as the S9 and S17, the most important steps are connecting the correct power cables, establishing an Ethernet connection, finding the miner’s IP address, accessing the web interface, configuring the mining pool, and monitoring hashrate and temperature.
The exact settings can vary considerably between Antminer generations. For this reason, model-specific documentation should always take priority over generic installation instructions.
After installation, regularly monitor the miner’s hashrate, temperature, fans, hashboards, pool connection, and firmware. Proper power management, cooling, network configuration, and maintenance can help keep an ASIC mining system stable and reliable.



Great article, totally what I was looking for.
Hey! This is kind of off topic but I need some guidance
from an established blog. Is it tough to set up your own blog?
I’m not very techincal but I can figure things out pretty fast.
I’m thinking about creating my own but I’m not sure
where to begin. Do you have any tips or suggestions?
Thank you
Thanks for any other informative web site. The place else may I am getting that type
of info written in such a perfect manner? I’ve a project that I’m simply
now operating on, and I have been on the glance out for
such information.
Wow, superb blog format! How lengthy have you been blogging for?
you make blogging glance easy. The entire look of your web site
is wonderful, let alone the content!
Very nice blog post. I definitely appreciate this website.
Keep writing!
It’s an awesome article for all the online users; they will
obtain benefit from it I am sure.