NiceHash is a platform for cryptocurrency miners that combines a hash-power marketplace with mining services. It is important to distinguish the two: a buyer on the marketplace purchases hashrate and directs it to a compatible target pool, while a miner selling hashrate is paid under NiceHash’s current reward rules. A conventional mining pool, by contrast, distributes rewards according to its own payout method.
This guide focuses on using NiceHash as a miner, checking account and worker statistics, and configuring a compatible ASIC or third-party miner. The screenshots later in this article were captured in 2020; treat them as historical illustrations because menus, supported algorithms, server addresses, fees, and payout settings can change.
Before connecting hardware, verify the algorithm, stratum URL, port, SSL/TCP option, and username in NiceHash’s current official documentation and your device manufacturer’s instructions. Use the mining address shown in your account when required. Never share a wallet seed phrase, recovery phrase, private key, or password with a person or unverified page.
For background, see our Bitcoin mining basics guide, Antminer installation tutorial, and mining difficulty guide.
Before You Start
- Confirm that your device supports the algorithm and mining mode you plan to use.
- Use the current official stratum address for the selected algorithm; do not copy server details from old screenshots.
- Estimate electricity, equipment, cooling, and fees before assuming a setup is profitable.
- Enable available account security features and protect the email account tied to your NiceHash login.
- After connecting, check accepted and rejected shares, worker status, hashrate stability, and the platform’s current payout rules.
NiceHash’s official guide explains how to find the mining address for NiceHash Miner, QuickMiner, NHOS, and compatible third-party miners. The exact configuration depends on the device, algorithm, and whether you use an account mining address or an external wallet address.
NiceHash Mining: Overview and Setup
NiceHash is often described as a pool, but its products include a hash-power marketplace and mining services. The marketplace lets buyers rent hashrate and direct it to a compatible target pool; miners who contribute hashrate are compensated under NiceHash’s current reward rules. Choose the service that matches your goal and confirm the current terms before you start.
How the NiceHash Marketplace Works
NiceHash’s marketplace matches buyers who purchase hashrate with sellers who provide it. Buyers point purchased hashrate to a compatible target pool; sellers receive payment under NiceHash’s current reward system. This is not the same as buying a coin or receiving a target pool’s block reward directly.
Buying Hashrate: Costs and Risks
Order duration, bid or price, algorithm compatibility, valid shares, target-pool performance and fees affect the buyer’s result. Sellers should monitor current hashrate, accepted shares and payout records. Avoid using historical minimums or price examples as current terms; verify the live order interface and official documentation before placing an order.
Fees, Payouts and Profitability
There is no single fee figure that safely applies to every NiceHash product. Check current fee and payout information for the exact service, algorithm and withdrawal method. For mining, estimate net results after electricity, cooling, hardware depreciation, downtime, rejected shares, platform fees and withdrawal costs. For marketplace buyers, treat the order price as a cost and remember that the target pool’s luck and payout scheme may affect the value realized. No hashrate or reward estimate guarantees profit.
Interface and Security
The screenshots below date from 2020 and some labels or steps may no longer exist. Use the current official help center for configuration. Never share account passwords, one-time codes, seed phrases or private keys; enable available two-factor authentication and use a unique password.
Potential advantages (depending on the product):
- A central dashboard for supported mining activity and worker statistics
- Published Stratum configuration details for supported algorithms
- Marketplace options for buyers and sellers of hashrate
Limitations and risks:
- Fees, order pricing and payout rules can change and must be checked before use
- Returns depend on electricity, hardware efficiency, downtime, accepted shares and market demand
- Using a platform account introduces account-access and service-dependence risks
Compare the current terms and configuration options with your needs before choosing a service. Do not treat a platform’s displayed estimate as a guarantee of earnings.
Choose the Right NiceHash Workflow
Before configuring a miner, decide what you are trying to do. NiceHash’s hash-power marketplace and its mining services serve different purposes, so the correct setup depends on whether you are supplying hashrate, buying it, or simply monitoring equipment.
- Supplying hashrate: Configure compatible hardware with the current NiceHash Stratum endpoint for the algorithm. Follow the published username format and reward terms for your account or mining mode.
- Buying hashrate: Review the target pool’s compatibility, the selected algorithm, order price, duration and current marketplace terms before placing an order. Buying hashrate is a cost, not a guaranteed return.
- Monitoring equipment: Use the current dashboard or Rig Manager features supported by your device and account. Check worker status and accepted/rejected shares rather than relying only on the hashrate shown on the machine.
NiceHash’s official RTPPS reward-system explanation describes how miners are compensated for valid shares under its model. Read the current terms before assuming that payouts work like those from another pool.
Connecting an ASIC or Third-Party Miner
- Confirm the miner model, supported algorithm, firmware version and network connection. Never select an algorithm solely because it appears in a screenshot.
- Open the official NiceHash documentation for available Stratum servers and choose the endpoint that matches the algorithm and the connection type supported by your device.
- Copy the full Stratum address and port into the miner’s pool configuration. For account-based mining, use the mining address shown in your NiceHash account and add a worker suffix only in the format documented for the device.
- Enter the password or placeholder required by the current NiceHash instructions for that algorithm and miner. Do not assume every miner’s configuration fields behave identically.
- Save the settings and restart the device only if required. Check that the worker connects and begins submitting accepted shares.
For a broader hardware setup walkthrough, see Poolyab’s Antminer installation tutorial. Device-specific menus and firmware options can differ, so use the manufacturer’s manual alongside NiceHash’s current documentation.
Common Connection Problems
- Wrong algorithm: A Stratum endpoint for a different algorithm may reject work or fail to connect. Match the endpoint to the device and coin/algorithm configuration.
- Incorrect address or worker format: Copy the mining address carefully and check the required username format. A missing character can prevent shares from being credited correctly.
- Port or encryption mismatch: Some devices support TCP only, while others can use SSL/TLS. Select a port and connection method supported by both the endpoint and the miner.
- Rejected or stale shares: Check latency, firmware stability, overclocking, cooling, and the target-pool configuration. A high displayed hashrate is not useful if work is rejected.
- Worker appears offline: Confirm power, network access, system time, DNS/firewall rules and the saved configuration. Restart only after checking the settings and the device’s instructions.
- Dashboard differs from the device: Hashrate and earnings may be averaged over different intervals. Allow time for the dashboard to update and compare accepted-share statistics rather than expecting identical instant readings.
Estimate Costs Before Mining
A realistic estimate should account for more than the headline hashrate. For a miner supplying hashrate, a simplified net-result calculation is:
Estimated net result = rewards or credited earnings − electricity − cooling − fees − hardware depreciation − other operating costs.
Use your actual electricity tariff and measured power draw, and allow for downtime, rejected shares, network conditions, payout thresholds and withdrawal charges. For marketplace buyers, include the order cost and consider whether the target pool’s payout method and block luck affect the result. Mining difficulty and market conditions change, so estimates should be refreshed before making a purchasing decision. See our guide to mining difficulty for background.
Frequently Asked Questions
Is NiceHash exactly the same as a traditional mining pool?
No. NiceHash offers a hash-power marketplace and mining services. Buyers, sellers and account-based miners can have different workflows and reward arrangements.
Do I need to use an account mining address?
That depends on the supported mining mode. NiceHash documents account mining addresses for compatible miners and may support other configurations. Follow the current official instructions for your device and setup.
Are NiceHash earnings guaranteed?
No. Results depend on the selected product, hashrate, valid shares, order pricing where applicable, costs, fees and changing market conditions.
Are the screenshots below current?
No. They were captured in 2020 and are retained as historical illustrations. Use the current NiceHash help center for present-day labels, server addresses, fees and payout rules.
How to Connect a Miner to NiceHash
This section shows the general steps for connecting a compatible miner to NiceHash. The exact dashboard labels may have changed since the screenshots were captured, so use the current official mining-address and Stratum documentation linked below before applying settings.
NiceHash account creation tutorial
As we said, creating an account in the NiceHash mining pool is very easy and you can easily create an account in this pool. All you need to register for this pool is an email. If you do not currently have an email, first create an email and then follow the steps below with the available images.
Follow the steps below to register for the NiceHash Pool.
1- Open the official NiceHash website and choose the current sign-up or sign-in flow. Confirm the domain and follow the current help-center instructions; the screenshots below are from 2020 and are not a live walkthrough.
2- Select the current account-creation option and follow the prompts shown by the official site. Interface labels can change, so do not rely on the old button label shown in the screenshot.

3- Use an email address you control and a unique, strong password. Complete only the verification and consent steps currently shown by the official site. Review current terms before proceeding, and never enter a wallet recovery phrase or private key as part of account registration.
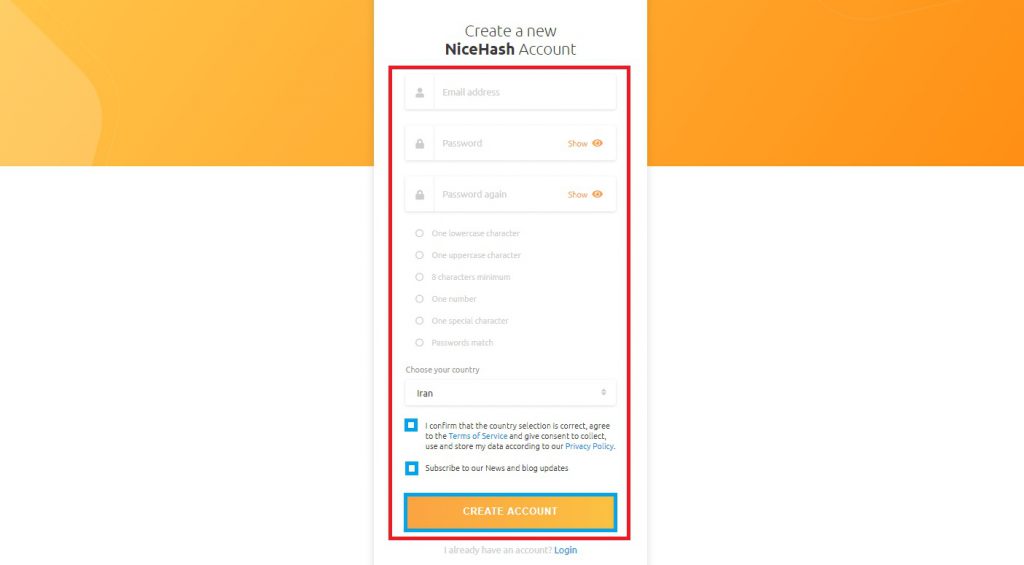
4- Complete the verification step currently shown in your NiceHash account, such as entering an email code if prompted. Never treat a 12- or 24-word wallet recovery phrase as an email verification code, and never share a seed phrase or private key with a platform, support agent, or website. Use a unique password and enable available two-factor authentication.
5- After completing the verification method requested by the official site, sign in using your account credentials. Check that you are on the genuine NiceHash domain before entering sensitive information; a wallet recovery phrase is not needed for ordinary account sign-in.
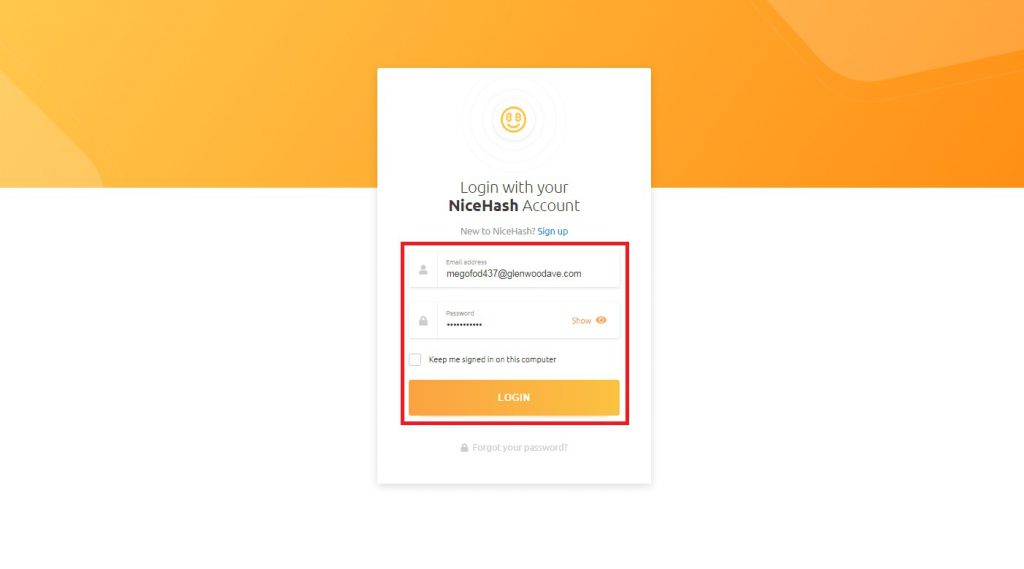
After entering the information, click on Login. You have successfully created an account in the NiceHash Pool. All you have to do is work with the pool and connect it to your miners. As you can see, it is very easy to register in this pool, but according to the middle of the article, working with this pool can be a bit complicated for beginners. In the following, we have fully taught this subject. If you have any problems, read this part of the article.
NiceHash pool training
Here’s how to put one together for use with your NiceHash pool. If working with this pool is a little difficult for you, stay tuned.
1- Sign in to the official NiceHash site and open the current Mining section. If you plan to mine to your NiceHash account, follow the official guide to finding your mining address. Interface labels may differ from the historical screenshot below.
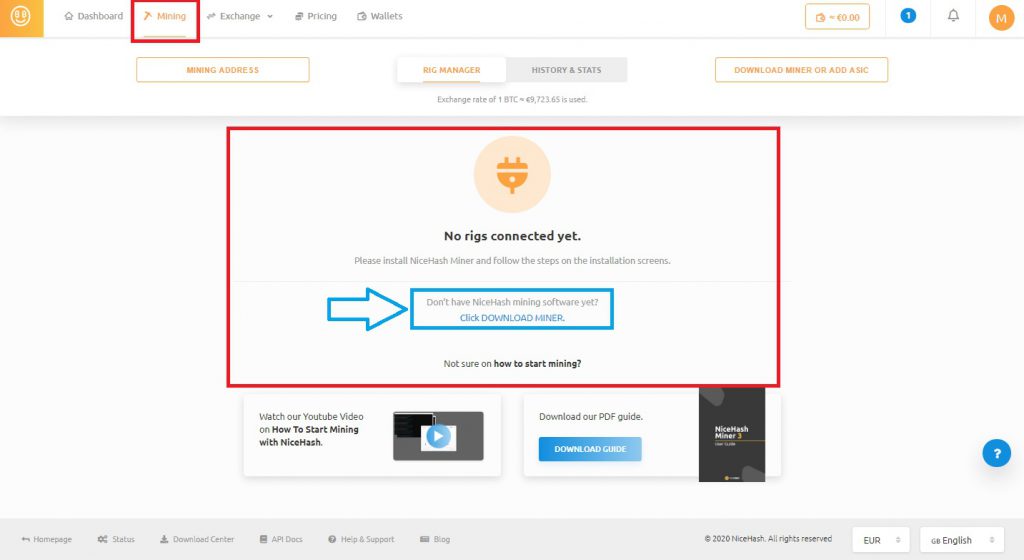
2- For an ASIC or third-party miner, open NiceHash’s current Stratum server documentation and select the algorithm that matches your hardware. Copy the exact server address and TCP/SSL port shown for that algorithm; do not rely on values in an old screenshot.
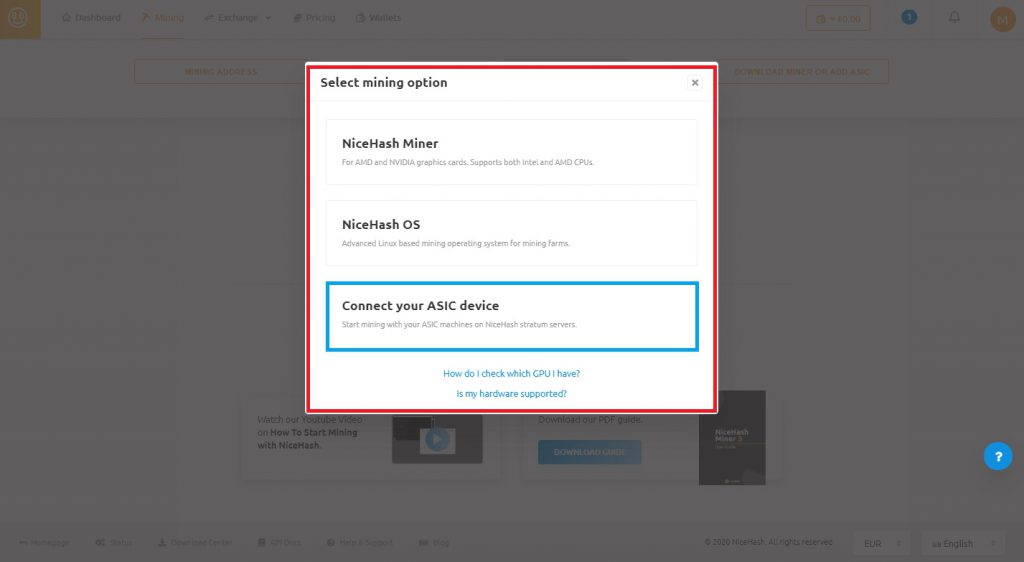
3- In the miner’s configuration page, enter the selected Stratum URL and the correct username format. For account-based mining, NiceHash documents using the mining address with an optional worker suffix such as MiningAddress.WorkerName. Follow the current instructions for your algorithm and device; password conventions can vary by miner.
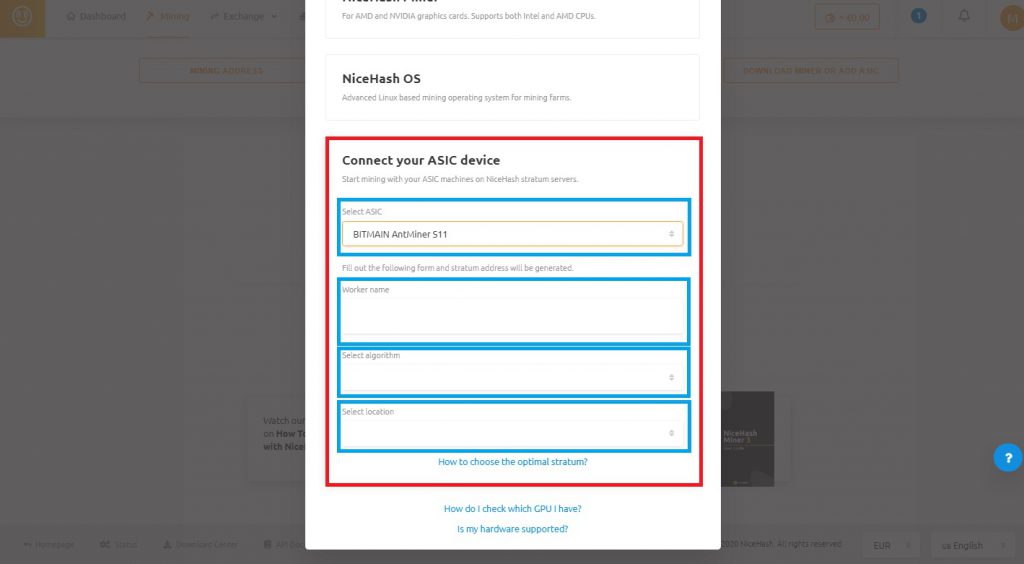
4- Save the configuration and restart the miner only if the device requires it. Return to the NiceHash dashboard to check that the worker is online, hashrate is stable, and shares are accepted. If it does not connect, recheck the algorithm, address, port, credentials, network settings and device manual before changing other settings.
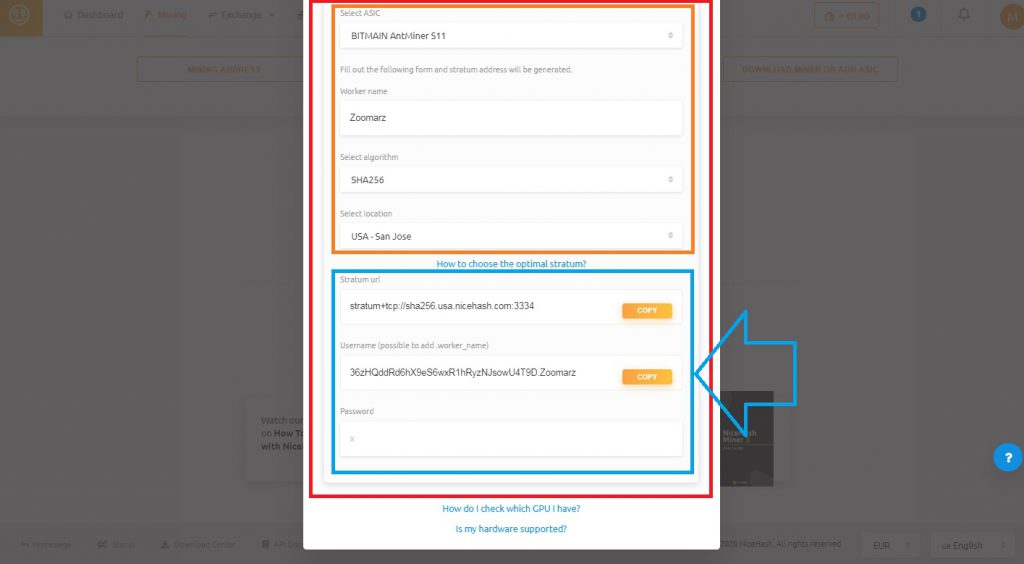
As you can see, this was easy to do, and according to the middle of the article, it might be a little difficult for beginners without guidance. The work is done and you can easily follow the mining of the desired digital currency.
How to view pool information
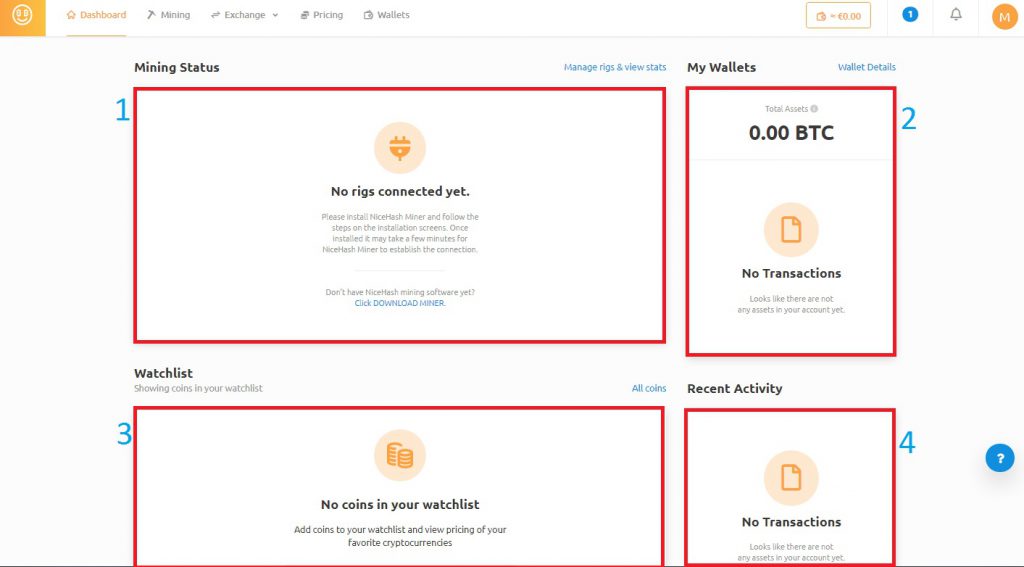
After a worker connects, use the current dashboard or Rig Manager views to check worker status, reported hashrate, accepted/rejected shares, earnings and payment history. Labels and available statistics depend on the NiceHash product. The screenshots in this article are historical and may not match today’s interface; displayed estimates are not guaranteed payouts.


